n8n in a Nutshell
n8n is a free, open-source automation tool built on Node.js. It lets you create visual workflows to automate tasks across 400+ services like Gmail, Google Sheets, and APIs. You can also add custom logic using JavaScript. n8n can be self-hosted or run in the cloud, making it a flexible solution for building powerful automations without code.
What is Tweet Sentiment Analysis?
Tweet Sentiment refers to the underlying emotion or opinion expressed in a tweet. It can be positive, negative, or neutral, helping businesses and individuals understand public feelings and reactions about a topic, brand, or product on X (formerly Twitter).
By analyzing tweet sentiment, you can gain valuable insights into customer satisfaction, brand reputation, and trending opinions — all automatically and in real-time using tools like n8n combined with AI-powered sentiment models.
Effortless Tweet Sentiment Analysis with n8n & GPT API
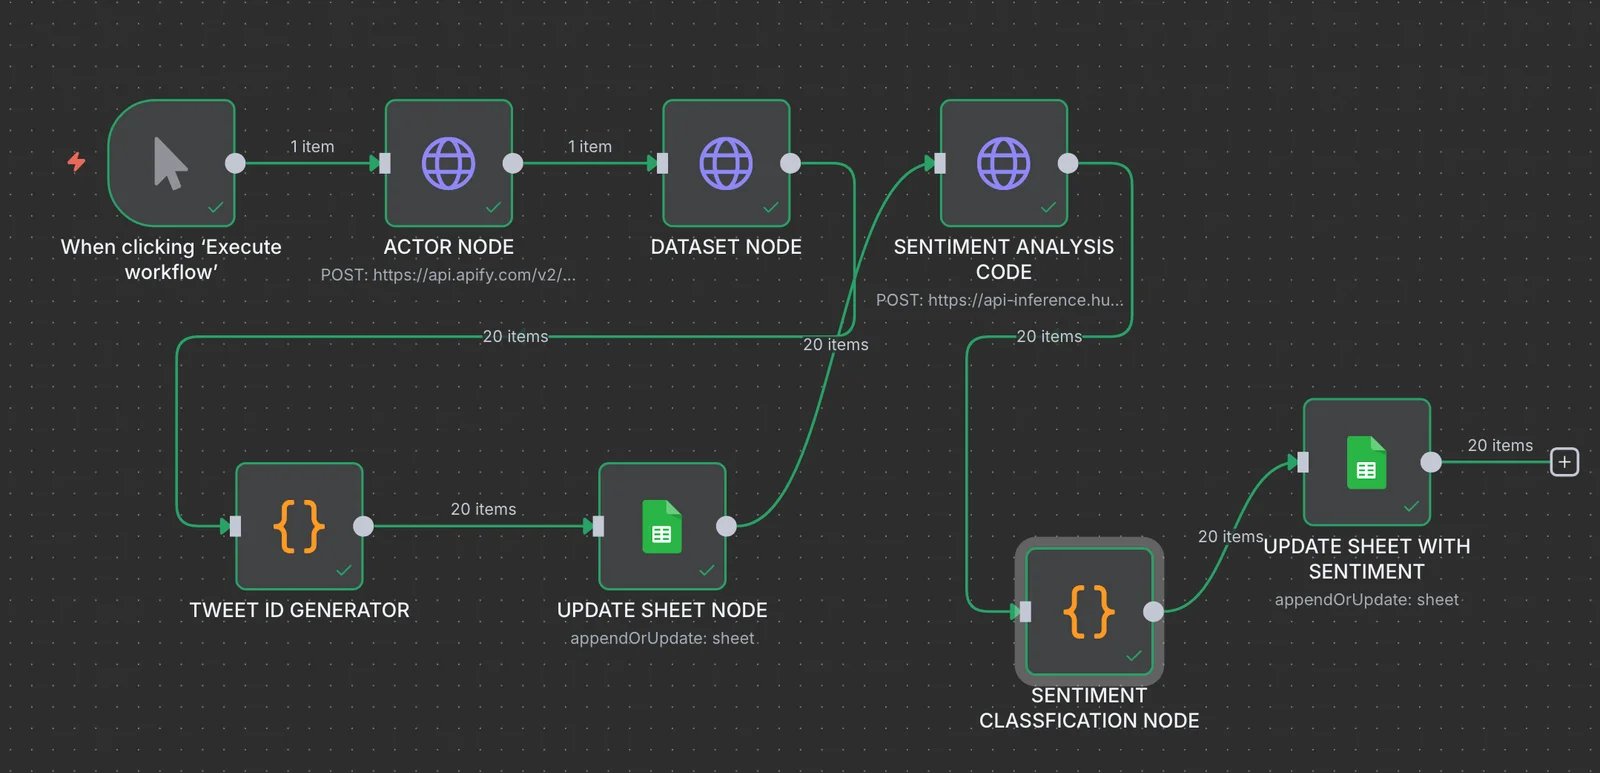
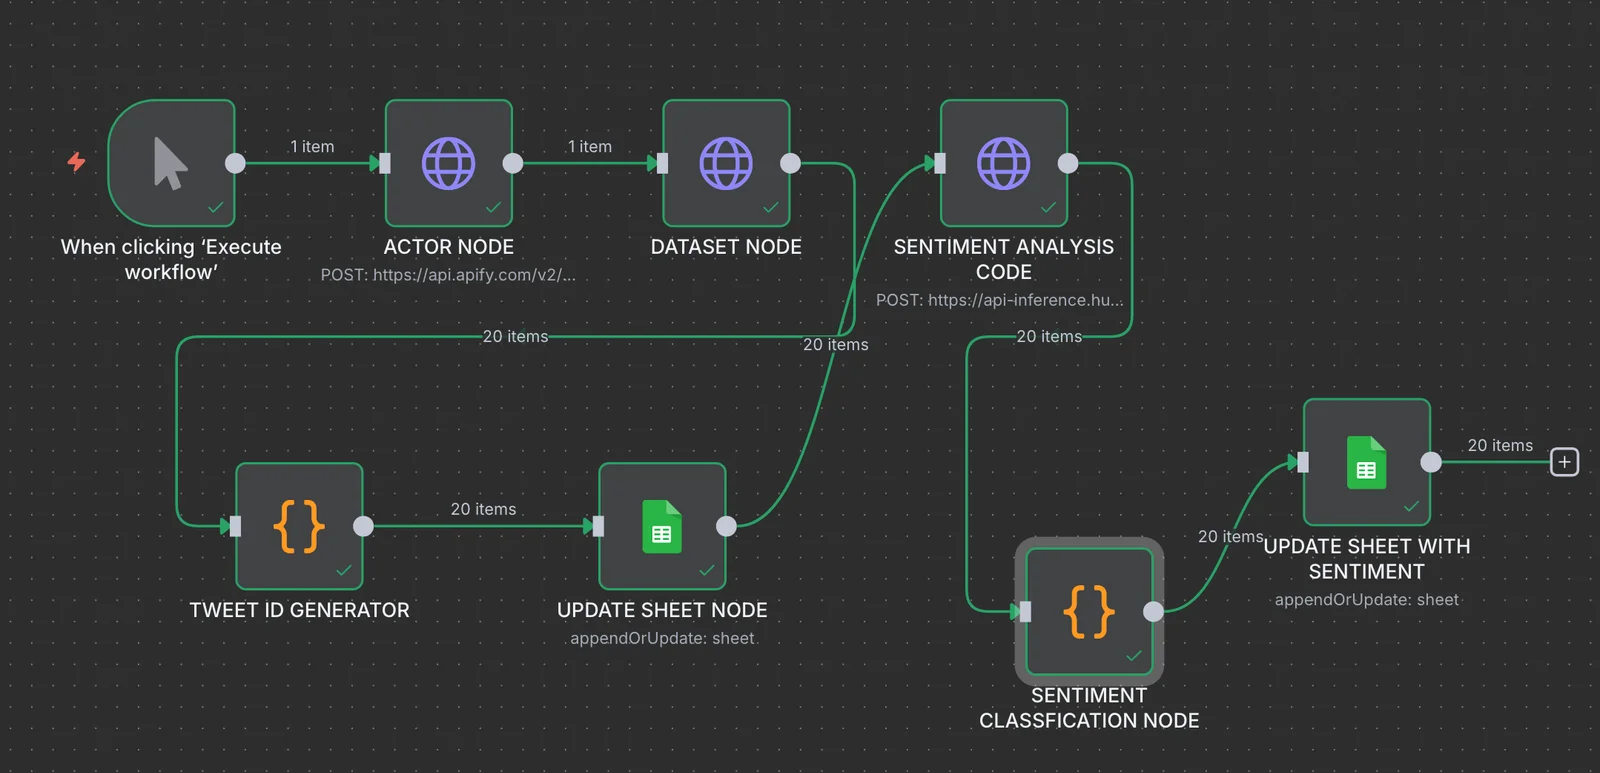
Workflow Steps
Don’t be overwhelmed! The steps are explained clearly in the sections below, with step-by-step guidance.
- Run Apify Tweet Scraper Actor via HTTP node
- Get datasetId from actor run
- Fetch dataset using datasetId via another HTTP request
- Use Code node to assign random unique IDs to tweets
- Add tweets to Google Sheet
- Use Hugging Face model cardiffnlp/twitter-roberta-base-sentiment to analyze sentiment
- Use Code node to categorize the sentiment as Positive, Negative, or Neutral
- Update Google Sheet with the final sentiment results
Note: The link to the model and the Apify actor used is mentioned at the bottom of the blog for easy reference.
Purpose of This Automation Workflow
This workflow automates tweet sentiment analysis to help track product feedback and public perception. It starts by running an Apify actor to scrape tweets based on any keyword, product name, or Twitter handle. The tweets are fetched using the dataset ID, cleaned, and assigned a unique random ID using a Code node. All tweets are then logged into a Google Sheet. The Hugging Face model cardiffnlp/twitter-roberta-base-sentiment analyzes sentiment, and a Code node categorizes it as Positive, Negative, or Neutral. Finally, everything — from the actual tweet to its sentiment — is updated in the Google Sheet for easy review.
A Real-World Problem, Solved With Automation
A client wanted to monitor public opinion about their product on Twitter — how people were reacting, what kind of reviews they were getting, whether the buzz was positive or negative, and how much hype their product was really generating.
Manually checking tweets, copying them into sheets, and interpreting tone was slow, inefficient, and highly error-prone.
We built a fully automated solution in n8n— it scrapes live tweets about the product, classifies the sentiment using Hugging Face, and logs everything to Google Sheetsin real time. Whether it's praise, criticism, or just neutral buzz, the client now gets a clear snapshot of how their product is being received — without lifting a finger.
A process that once demanded constant attention is now smart, automated, and insightful.
Prerequisites
- 1Google Sheets API Credentials: Set up and connect your Google Sheets API credentials in n8n. This allows the workflow to read from and write to your target spreadsheet.
- 2Hugging Face API Token: Have a valid Hugging Face API token for accessing the sentiment analysis model (cardiffnlp/twitter-roberta-base-sentiment).
- 3Apify API Token: Set your Apify API token in n8n to run a tweet scraping actor. You can use any actor you prefer, or follow along with: kaitoeasyapi/twitter-x-data-tweet-scraper-pay-per-result-cheapest.
How We Built This Automation
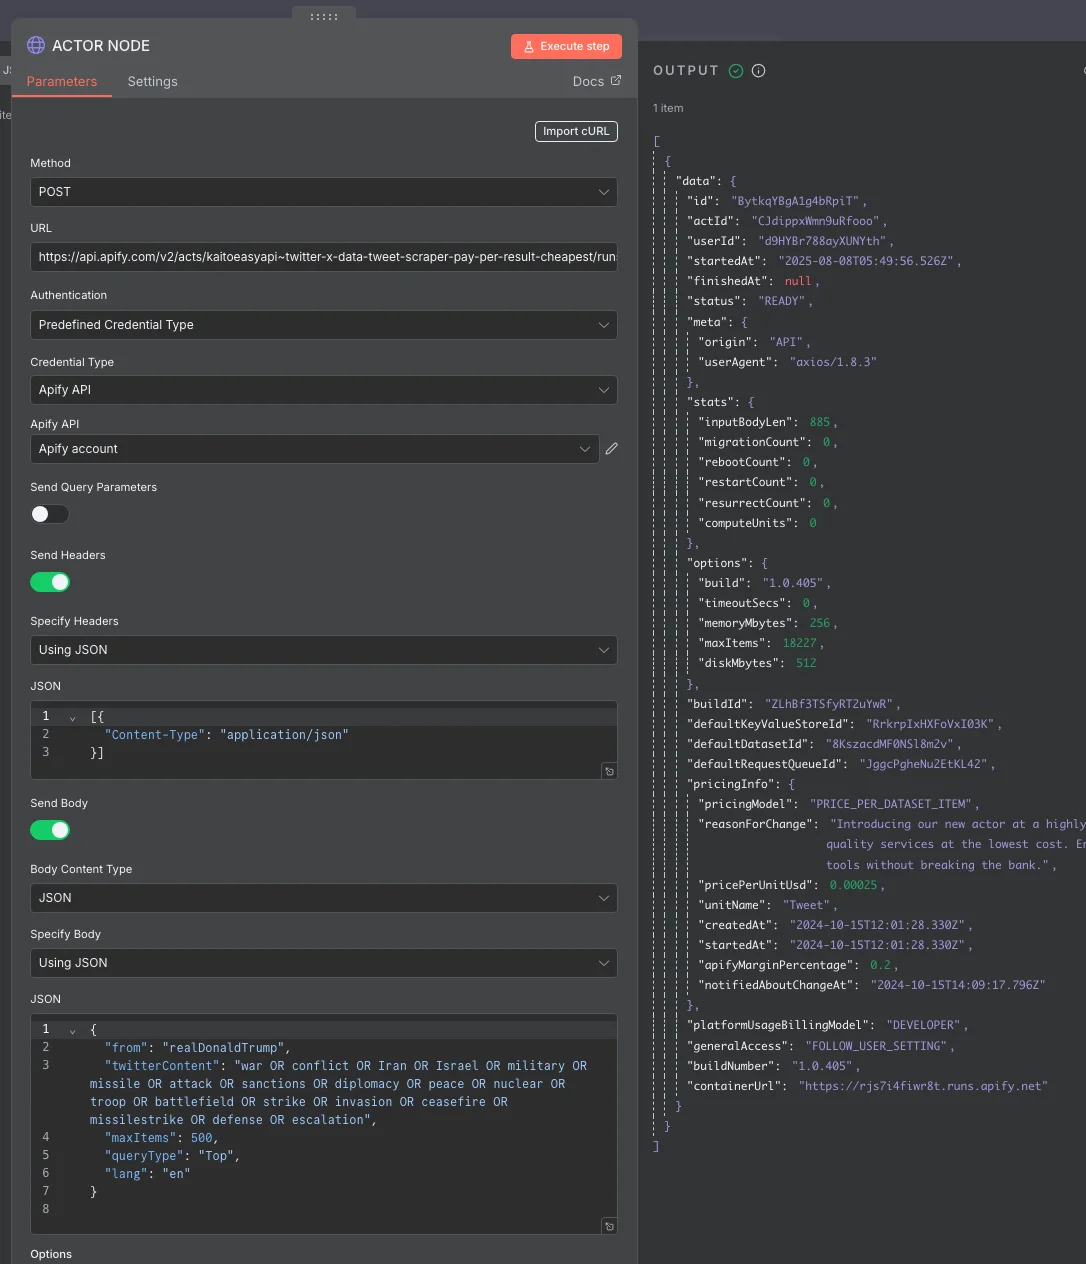
Step 1: Trigger Apify Actor to Scrape Tweets
We started with an HTTP Request node in n8n to run the Apify Tweet Scraper Actor. This retrieves tweets matching a specific search query.
HTTP Request Configuration
- Method:
POST - URL:
https://api.apify.com/v2/acts/kaitoeasyapi~twitter-x-data-tweet-scraper-pay-per-result-cheapest/runs?token=YOUR_APIFY_TOKEN - Authentication: Predefined Credential (Apify API)
- Headers:
Content-Type: application/json
Body (JSON):
{
  "from": "realDonaldTrump",
  "twitterContent": "war OR conflict OR Iran OR Israel OR military OR missile OR attack OR sanctions OR diplomacy OR peace OR nuclear OR troop OR battlefield OR strike OR invasion OR ceasefire OR missilestrike OR defense OR escalation",
  "maxItems": 500,
  "queryType": "Top",
  "lang": "en"
}
💡 Tip
- Customize twitterContent to match your niche. E.g. "AI OR ChatGPT OR LLM OR machine learning" for AI trends, or "Olympics OR gold medal OR Paris 2024" for sports updates.
- Change the from field to scrape tweets from any Twitter account you want.
- Change queryType to "latest", "top", or "mixed" depending on your needs.
Step 2: Extract Dataset ID from Apify Actor Response
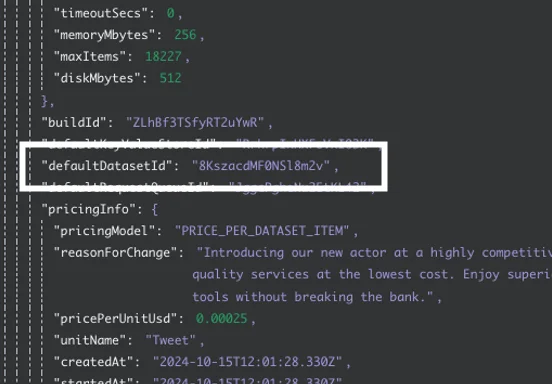
Apify returns a JSON object containing a datasetId after the actor runs. We captured this ID using an n8n Set or Function node for use in the next step.
Step 3: Fetch Tweet Data from Apify Dataset API
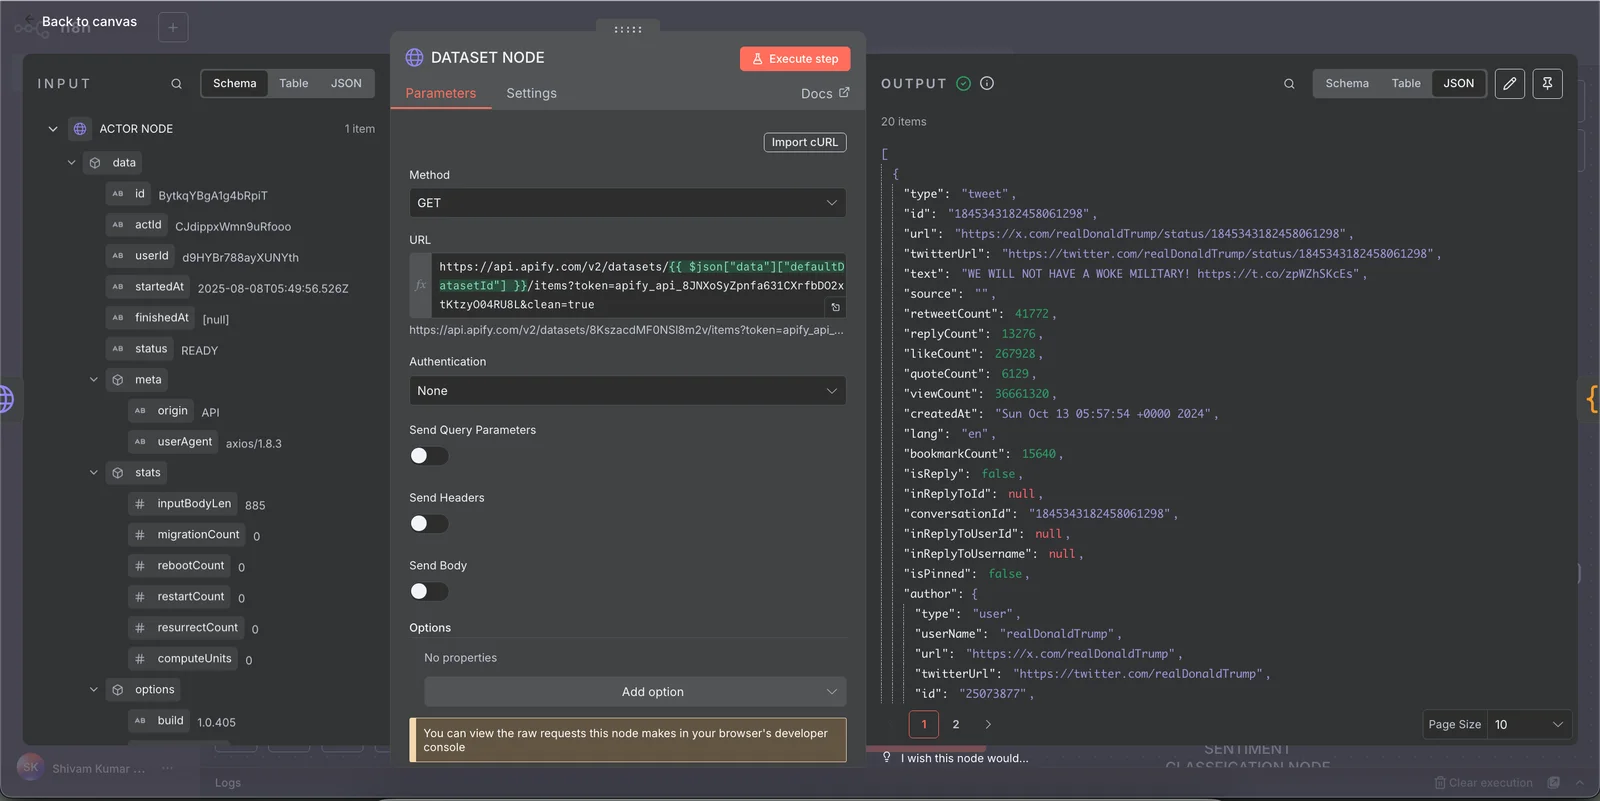
We used another HTTP Request node to fetch the actual scraped tweets using the dataset ID from the previous step.
HTTP Request Configuration
- Method:
GET - URL:
https://api.apify.com/v2/datasets/{{ $json["data"]["defaultDatasetId"] }}/items?token=YOUR_API_TOKEN&clean=true - Authentication: None (API token included in URL)
- Headers & Body: None
Step 4: Assign Unique IDs to Tweets
To avoid duplicates and make later processing easier, we used a Codenode to assign random unique IDs when missing. Sometimes, if the actor doesn't find real tweets (due to errors or no matches), it sends a mock tweet with id = -1. This code handles that by replacing -1 with a random unique ID. You can also modify this node to filter out such mock tweets completely, or skip this step entirely if you don't need ID management.
const items = $input.all();
const transformedItems = items.map(item => {
  const { id: originalId, ...rest } = item.json;
  const numericId = Number(originalId);
  const newId = numericId === -1
    ? Math.floor(Math.random() * 1000000000)
    : numericId;
  return { id: newId, ...rest };
});
return transformedItems;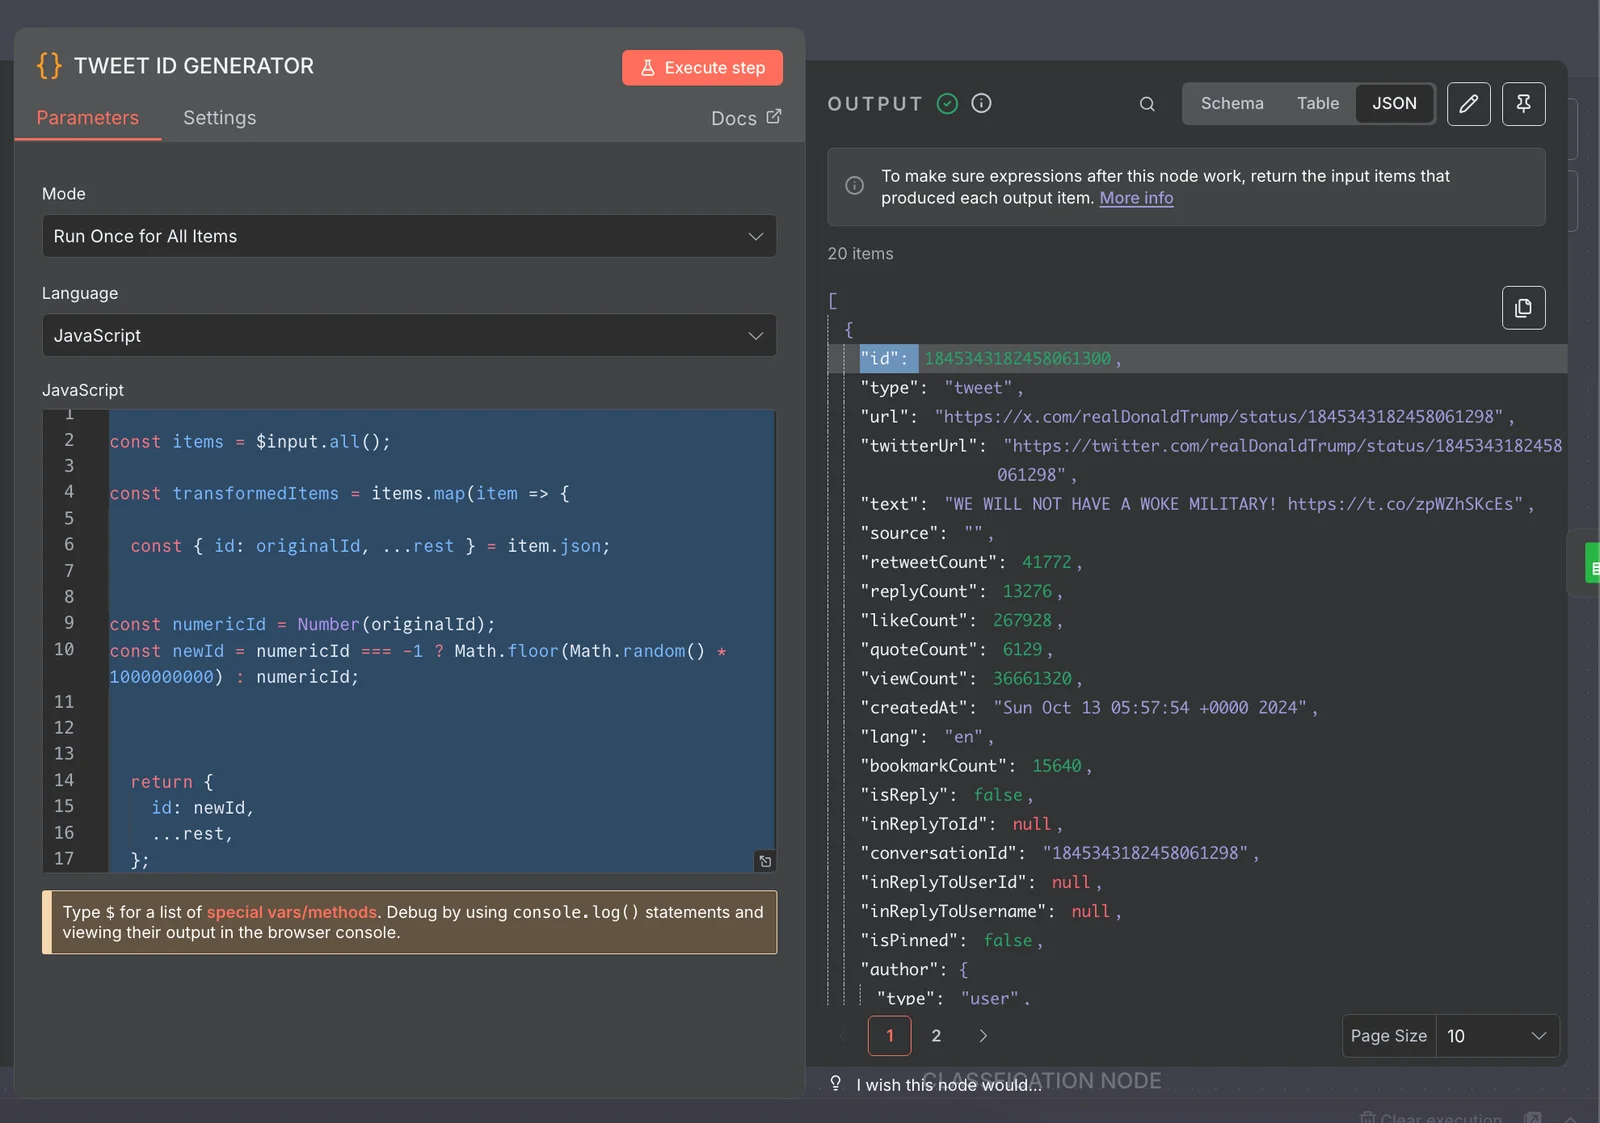
Step 5: Store Raw Tweets in Google Sheets
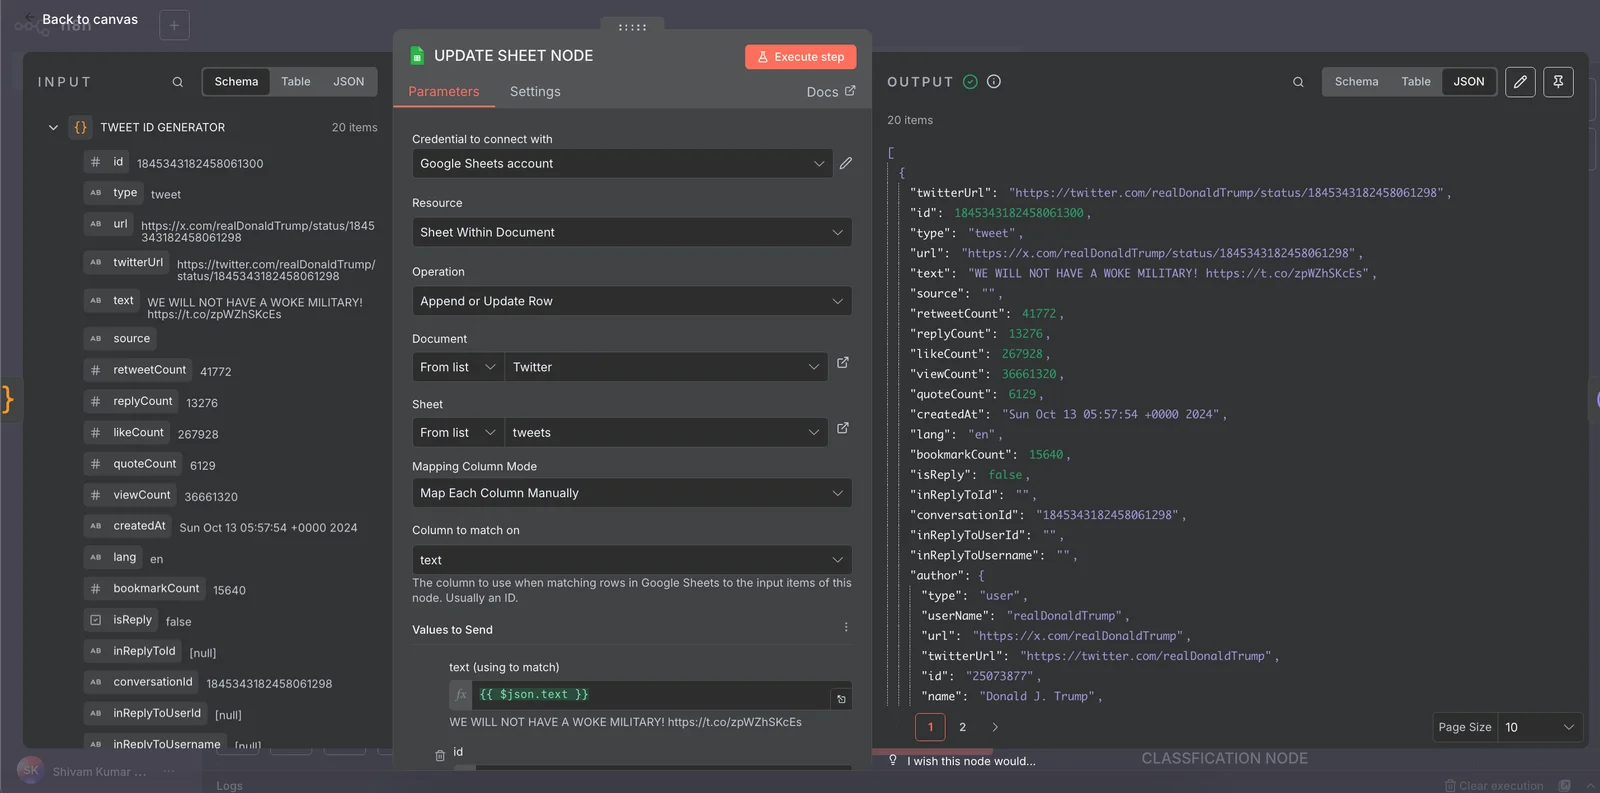
We used the Google Sheets node to append the fetched tweets into our document.
Configuration
- Credential: Connected Google Sheet account
- Resource: Sheet Within Document
- Operation: Append or Update Row
- Document: Twitter
- Sheet: tweets
- Mapping: Mapped each tweet field manually to columns
Step 6: Run Sentiment Analysis on Tweets
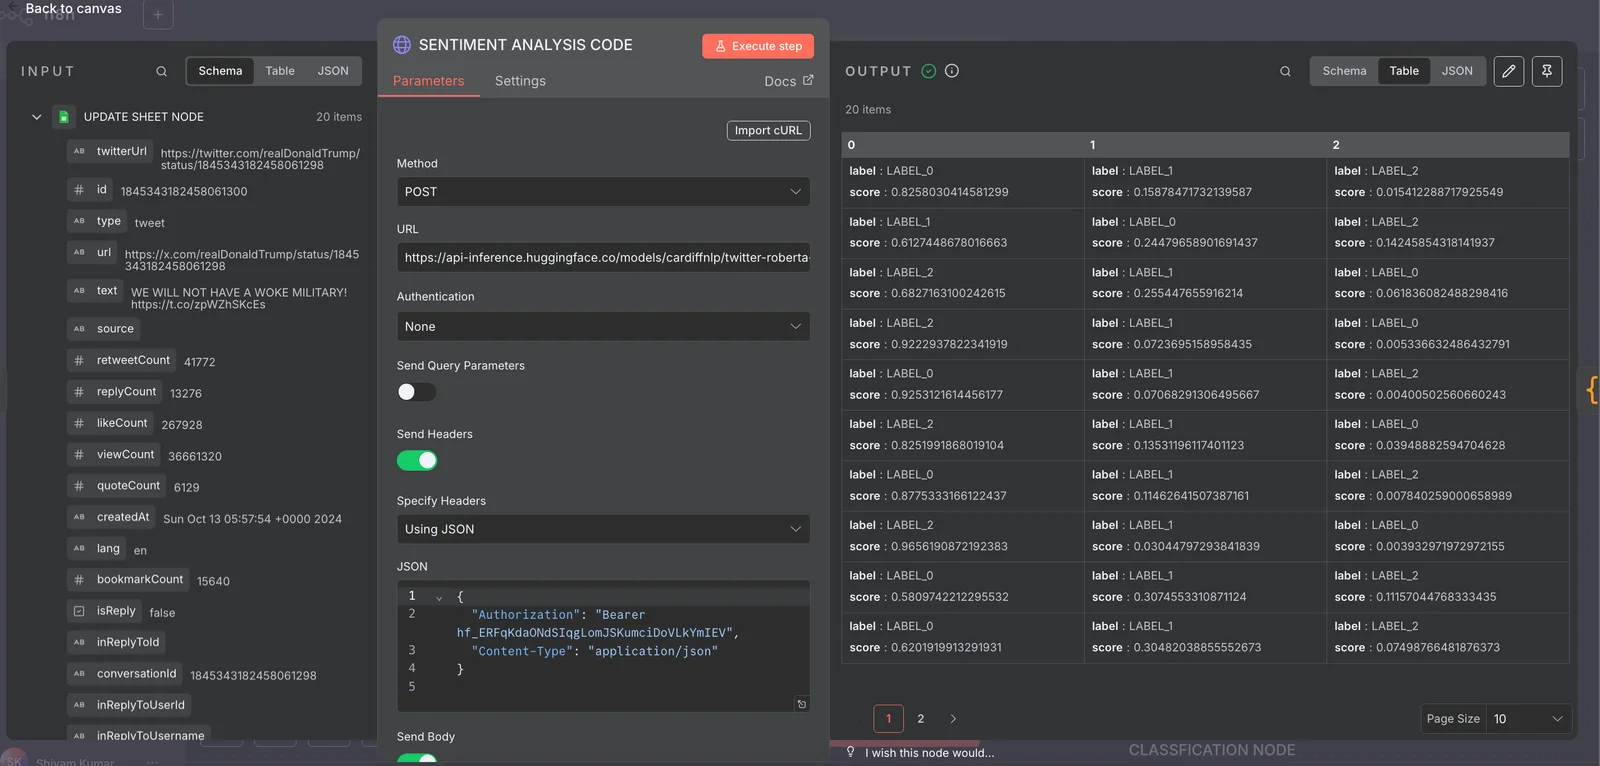
For sentiment analysis, we used Hugging Face's cardiffnlp/twitter-roberta-base-sentiment model via an HTTP Request node.
HTTP Request Configuration
- Method:
POST - URL:
https://api-inference.huggingface.co/models/cardiffnlp/twitter-roberta-base-sentiment - Headers:
Authorization: Bearer YOUR_HF_API_KEY,Content-Type: application/json - Body (JSON):
{ "inputs": "{{ $json.text }}" }
💡 Tip
You can try changing the model to distilbert-base-uncased-finetuned-sst-2-english for faster results while maintaining good accuracy. Feel free to explore other Hugging Face models to find the best fit for your needs.
Step 7: Map Hugging Face Labels to Human-Readable Sentiment
The Hugging Face model returns labels as LABEL_0, LABEL_1, and LABEL_2, corresponding to negative, neutral, and positive sentiments respectively. We used an n8n Code node to convert these into clear, human-readable terms and add a new sentiment field to each item:
// Process all input items
const items = $input.all().map(item => {
  const newItem = {...item.json};

  if (!newItem.sentiment) {
    const labelMap = {
      "LABEL_0": "negative",
      "LABEL_1": "neutral",
      "LABEL_2": "positive"
    };

    const results = [];
    ['0', '1', '2'].forEach(key => {
      if (newItem[key]) results.push(newItem[key]);
    });

    if (results.length > 0) {
      const top = results.reduce((max, current) =>
        (current.score > max.score) ? current : max,
        {score: -Infinity}
      );
      newItem.sentiment = labelMap[top.label] || 'unknown';
    } else {
      newItem.sentiment = 'unknown';
    }
  }

  return {json: newItem};
});

return items;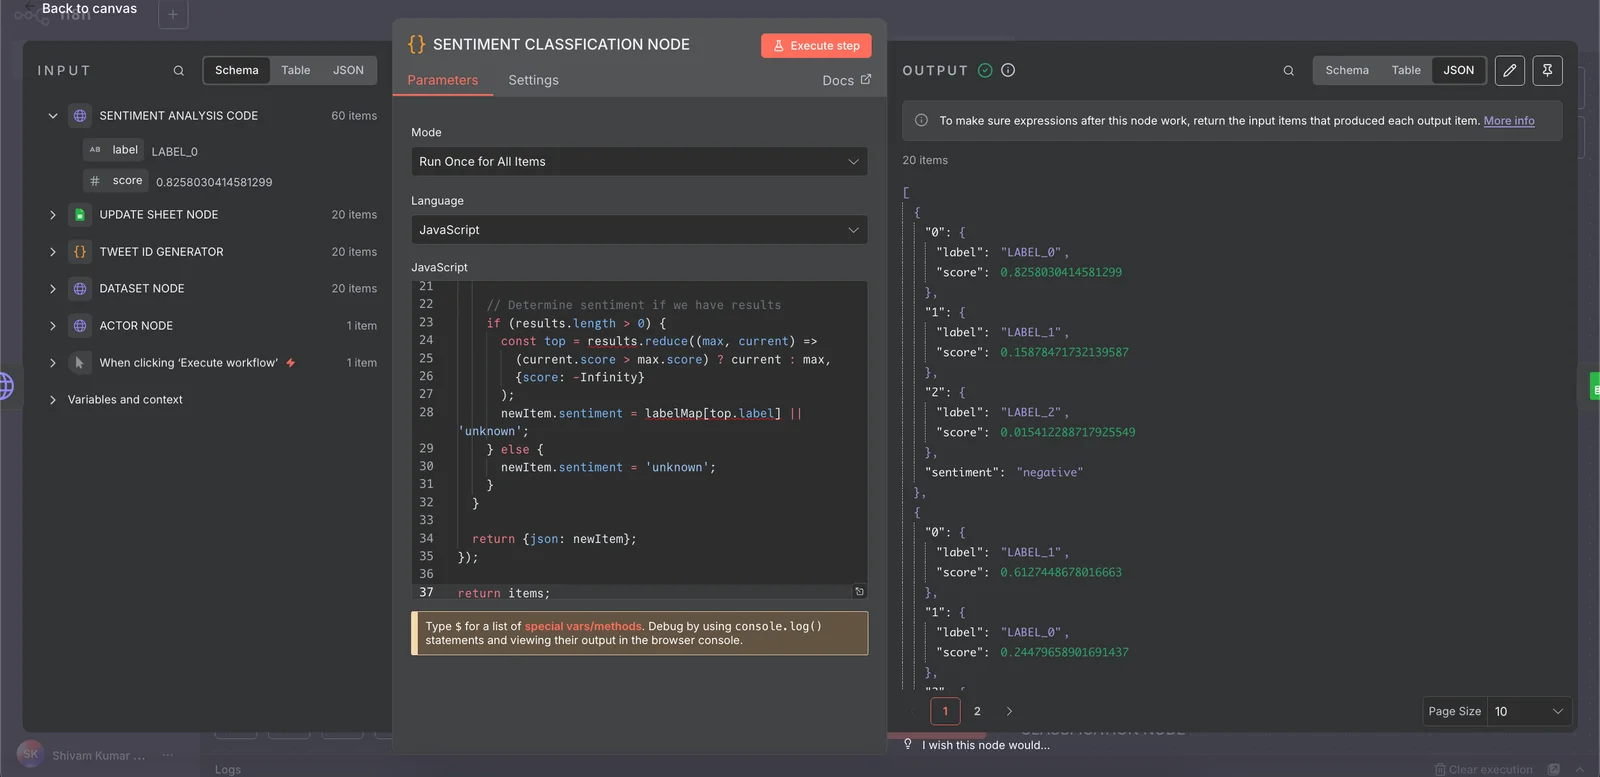
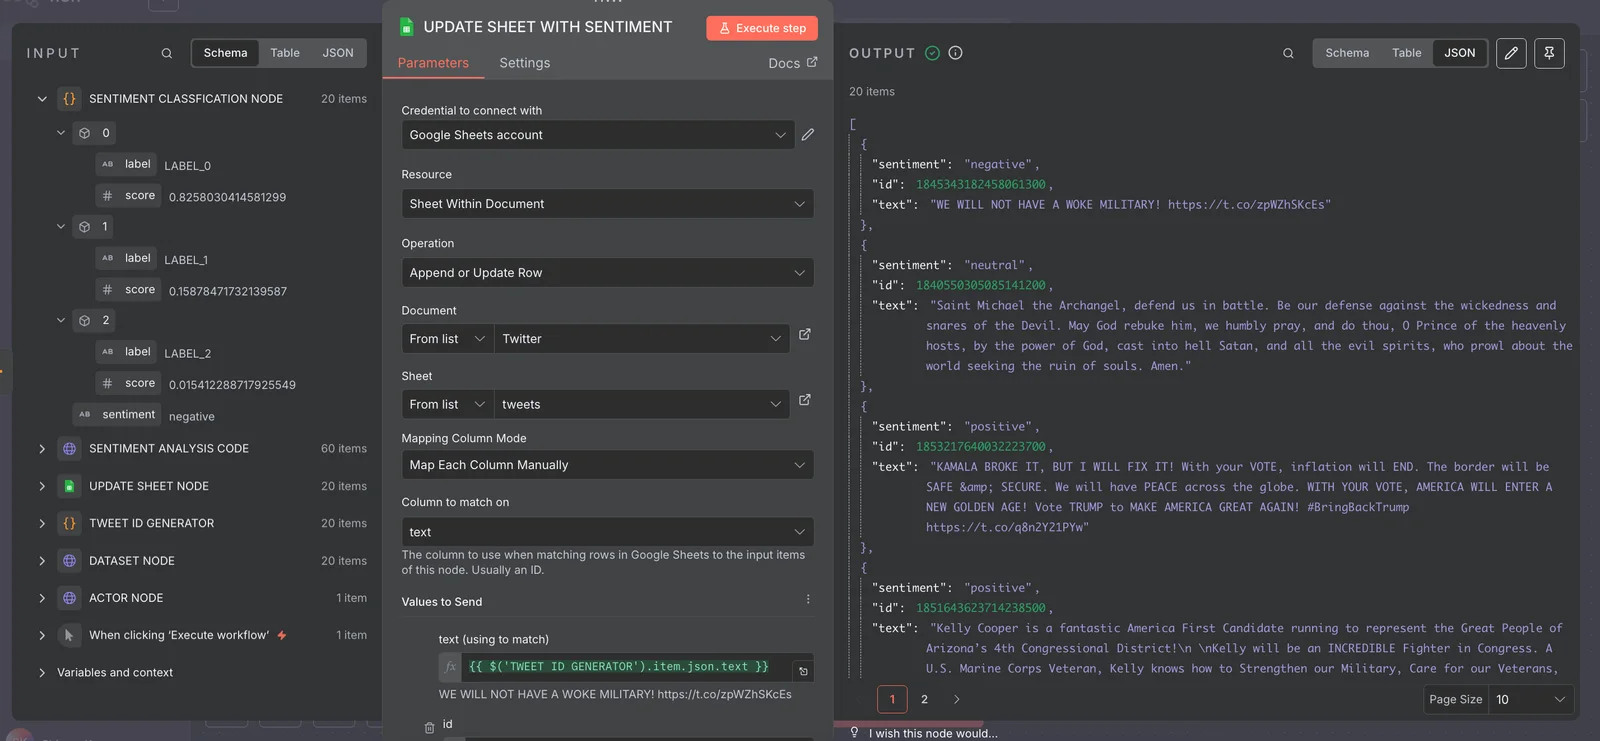
Step 8: Update Google Sheet with Final Sentiment
Finally, we appended the sentiment value back to the same Google Sheet, giving us a complete dataset with both tweet content and its analyzed sentiment in one place.
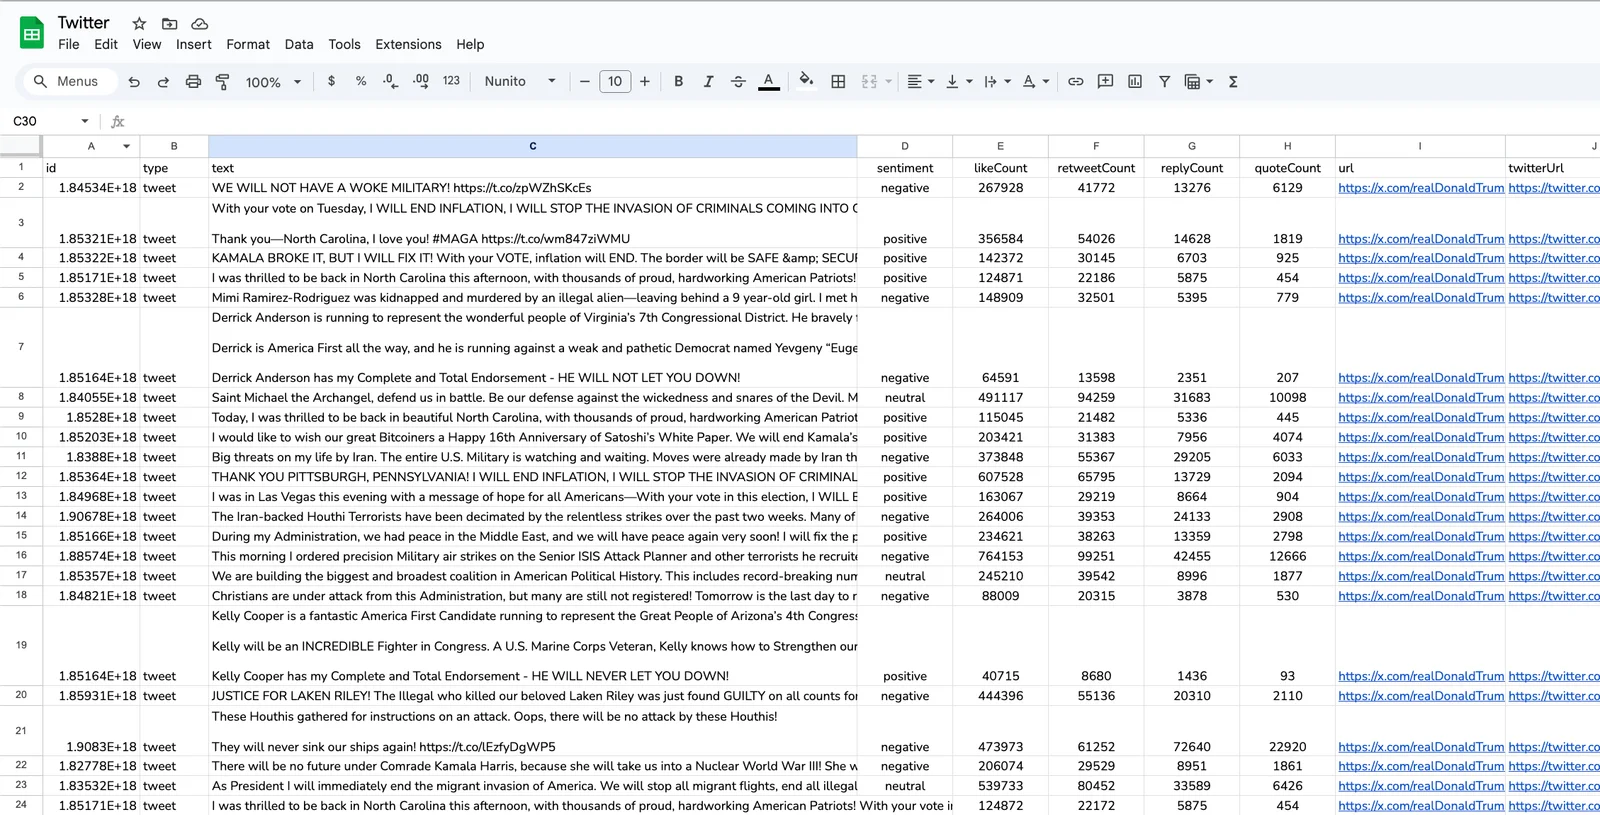
Here Is the Sheets Output Result
The scraped tweets along with their analyzed sentiments are neatly organized in Google Sheets, ready for review or further analysis.
Complete Workflow of n8n Automation
Below is the full visual diagram of our n8n workflow, demonstrating how all steps are connected seamlessly.
Resources & References Used in This Blog
We’ve used several models, tools, and resources while writing this blog. Here’s a handy list for you:
Thank You for Following Along!
We hope this guide helped you understand how to build a powerful sentiment analysis workflow using n8n, Google Sheets, Apify, and Hugging Face.
Whether you're tracking public feedback about your brand, analyzing product reviews, or monitoring online hype — this automated setup can save you hours of manual work and give you actionable insights in real time.
If you have any questions, want to expand this use case further, or need help setting up a similar automation for your business, feel free to reach out.
We at Parsedomare always here to help bring your automation ideas to life — with smart, scalable, and no-code solutions.
Need Custom Solutions?
Whether you're tracking public feedback about your brand, analyzing product reviews, or monitoring online hype this automated setup can save you hours of manual work and give you actionable insights in real time. We at Parsedom are always here to help bring your automation ideas to life. Reach out at info@parsedom.com.