
Amit Upreti
Scrapy is an open source python framework for extracting data from a website in a fast and simple way. The framework is maintained by Zyte, which is a platform to deploy scrapy projects. It is a high-level framework that allows developers to crawl a website and extract structured data from webpages. It is mainly designed for large-scale web scraping projects along with a comprehensive toolkit to process and store data in preferred format.
Scrapy has an interactive option known as scrapy shell, which can be used to quickly test your scraping code and make sure all the XPath and CSS selectors work. When carrying out web scraping at scale, it addresses the most frequent use cases:
- Multithreading
- Crawling (going from link to link)
- Extracting the data
- Validating
- Saving to different formats/databases
- Many more
Web scraping has become an indispensable technique for extracting valuable data from websites. Scrapy, a powerful Python framework, simplifies the process of building scalable and efficient web crawlers. In this step-by-step tutorial, we’ll guide you through the process of getting started with Scrapy and demonstrate how to scrape data from websites effectively.
Step-by-Step Tutorial: Scraping with Scrapy
Pip can be used to install Scrapy. To avoid incompatibilities with your system packages, the Scrapy documentation highly advises installing it in a separate virtual environment.
Hence, I’m using virtualenv and virtualenvwrapper:
mkvirtualenv scrapy_envTo begin, ensure that you have Python installed on your system. Open a terminal or command prompt and install Scrapy using the following command:
pip install scrapyLet’s create a new Scrapy project to organize our scraping code. In our desired directory, run the following command:
scrapy startproject project_nameIn my case, my project name is Lamar. This will produce all of the project’s boilerplate files.
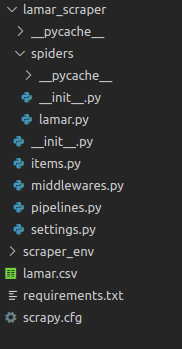
Here is a brief overview of these files and folders:
- items.py is a model for the extracted data. You can define a custom model (like a product) that will inherit the Scrapy Item class.
- middlewares.py is used to change the request/response lifecycle. For example, you could create a middleware to rotate user-agents or to use an API like ScrapingBee instead of doing the requests yourself.
- pipelines.py is used to process the extracted data, clean the HTML, validate the data, and export it to a custom format or save it to a database.
- /spiders is a folder containing Spider classes. With Scrapy, Spiders are classes that define how a website should be scraped, including what link to follow and how to extract the data for those links.
- scrapy.cfg is the configuration file for the project’s main settings.
Scraping a single product
Scraping a single job posting:
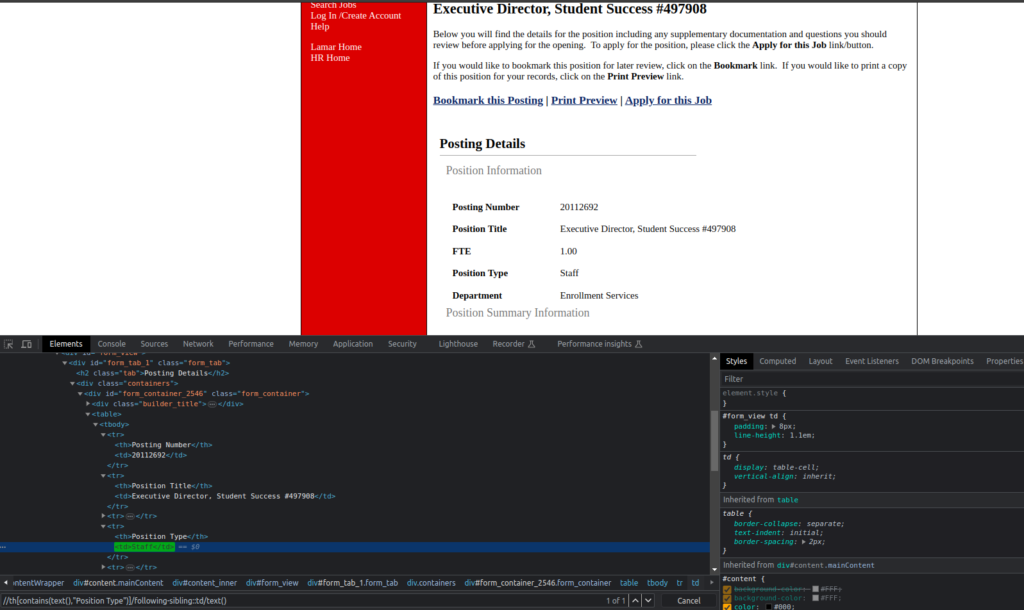
For our example, we will try to scrape a single job posting page from the following site

And we will want to extract the position title, position type, job department, minimum_qualification, and salary.
Scrapy Shell
A built-in shell in Scrapy enables you to experiment and debug your scraping code in real-time. It allows you to quickly test your CSS selectors and XPath expressions. I constantly use it to create my web scrapers because it’s such a wonderful tool!
Instead of using the built-in Python terminal, you can configure Scrapy Shell to utilize another console, such as IPython. You will receive colorized output, autocompletion, and other lovely extras.
Extracting Data With Scrapy
Now let’s try some XPath expression to extract the position title:
Creating a Scrapy Spider
Spiders are classes in Scrapy that allow you to specify your crawling (what links / URLs need to be scraped) and scraping (what to extract) behavior. Spiders are the heart of Scrapy, responsible for defining how to extract data from websites. Move to the project folder and navigate to the spider’s directory.
- It begins by initializing the request objects by passing the start URLs from the class’ start_urls array to start_requests(). To modify these steps, you can override the start_requests() function (for example, change the HTTP method/verb to use POST rather than GET or add login credentials).
- The response will then be saved in a Request object, which it will give to parse() after retrieving each URL’s content.
- Once the data has been extracted (in our case, the position title, position type, job description, minimum_qualification, and salary), the parse() method will return a dictionary, an Item or Request object, or an Iterable.
Create a new Python file, e.g., lamar_spider.py, and open it in your preferred editor. Define a spider class within the file, inheriting from scrapy.spider. Here’s a basic skeleton for your spider:
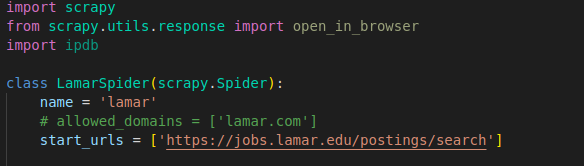
In this example, we’ve defined a spider named ‘lamar’ with a single starting URL. The start_urls attribute is a list of URLs that the spider will start crawling from. In this case, it contains a single URL 'https://jobs.lamar.edu/postings/search'. When the spider is started, it will send HTTP requests to these URLs and begin the crawling process.
It is a good idea to utilize the built-in Scrapy Item class even if Scrapy allows you to return the scraped data as a straightforward Python dictionary. It’s a straightforward container for our scraped data, and Scrapy will look at the fields of this item for several purposes, including the item pipeline and exporting the data to various formats (JSON, CSV, etc.).
Spider types
Spider types
There are quite a number of pre-defined spider classes in Scrapy
- Spider fetches the content of each URL, defined in
start_urls, and passes its content toparsefor data extraction - CrawlSpider follows links defined by a set of rules
- CSVFeedSpider, extracts tabular data from CSV URLs
- SitemapSpider extracts URLs defined in a sitemap
- XMLFeedSpider, similar to the CSV spider, but handles XML URLs (e.g. RSS or Atom)
Let’s start off with an example of Spider
Scrapy Spider Example
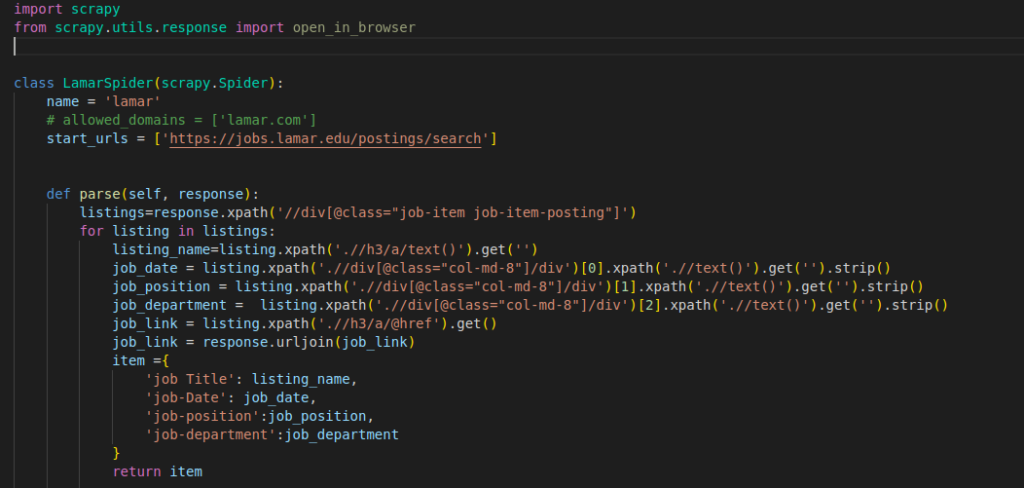
This code is an example of a web scraping spider implemented using the Scrapy framework in Python. The spider is designed to crawl the job listings on the website “https://jobs.lamar.edu/postings/search” and extract specific information from each job listing.
name, which is our Spider’s name (that you can run usingscrapy runspider spider_name)start_urls, defines an array of the URLs you’d like to scrape
The code is a basic Scrapy spider that scrapes job listings from a website. It uses XPath expressions to extract information such as job title, date, position, and department from each listing. The parse method is the main entry point where the extraction occurs. The spider returns the extracted data for the first job listing encountered. To scrape multiple listings, the code needs to be modified to store the data for each listing and return the collected results.
Let’s run our code in the following way, to export the data as CSV(but you could also choose JSON)
scrapy crawl lamar -o lamar_data.csvYou should now have a nice CSV file:

Conclusion
In this article, we learned how to use Scrapy to scrape the web and how it can help you overcome the most typical web scraping problems. Naturally, we have just scratched the surface and there are still a lot of intriguing topics to research, such as middlewares, exporters, extensions, and pipelines.
It’s simple to understand how Scrapy can help you save time and create scrapers that are easier to manage if you’ve been performing web scraping more “manually” with tools like BeautifulSoup / Requests. I sincerely hope you enjoyed this Scrapy tutorial and that it inspired you to play around with it.